Jun 08, 2016
Building: Tweet at Senate.
I recently built the Tweet-at-Senate application, a simple web app that lets users tweet once every day to the Nigerian senate, imploring them to slash their salaries. All it requires from the user is Twitter authentication, after which it posts the tweet randomly. You can read more about the inspiration behind the application here or on it’s homepage.
The purpose of this here article is to outline how I built it, for those who are curious and willing to learn. It’s actually really simple to build and it took less than a day to get the functionality all set up.
You’ll need to have an intermediate to advanced grasp of Ruby on Rails and it’s paradigms to be able to keep up with this tutorial.
Also feel free to holla at me on Twitter (@timigod) with any questions you might have.
Let’s get this started.
Stack: Ruby on Rails 4, Heroku (for hosting), OmniAuth, Redis, Resque & Resque Scheduler, Foreman etc.
How it all works
Before we get into detail, I think it’s better we discuss the process flow of the application. The following are the steps involved in this process flow:
- User signs in via Twitter.
- Once every day, the application loops through each user and picks a random time during the day to post a Tweet.
To accomplish the above, I used the following gems:
- omniauth-twitter: this simplifies the whole OAuth Twitter process into a few lines of code.
- twitter: this is a ruby interface to the Twitter API. To be used after authentication is somehow obtained (using the gem above, in this case). You can use it to pull tweets, pull users, send tweets and pretty much anything the Twitter API allows.
- resque: this is a gem used for handling background jobs. I use it in scenarios where I have certain tasks that you don’t want blocking the flow/operation of your entire app, so I just send them off to an asynchronous queue where they get picked off and performed. Resque is built using Redis and as such, you need to set up redis to get it to work.
- redis: Redis itself is a really fast data structure server. Basically, it lets you “cache” and retrieve data really quickly. You can (and should) read more about Redis here. The redis gem is a ruby client library for Redis.
- resque-scheduler: this is an add on, so to speak, to resque that allows ones to queue jobs in the future. This required because, though resque allows you to send processes off to a queue (in form of a job), it doesn’t let you determine the time the process should start off and that’s what this baby does. I used the “delayed job” feature of this gem which works like as follows: It puts jobs on a special delayed job queue while noting the time they’re to be processed. Once the time has been reached, it takes the job and places it on the regular resque queue.
- foreman: I used this gem to let me have two workers on one Heroku Dyno. “Workers” are the entities responsible for processing stuff that’s on the Resque queue. I need one to manage scheduled jobs and another to process these jobs once they’ve been put on the main resque queue.
I also used this Heroku Add-on called Heroku Scheduler which is “an add-on for running jobs on your app at scheduled time intervals, much like cron in a traditional server environment.” It’s what is responsible for setting off the scheduling actions once every day.
Authentication via Twitter
Authentication with Twitter is very simple with the omniauth-twitter gem. This video does a good job of explaining everything you need to know and their documentation is lit too.
First thing you have to do is register your app on Twitter’s Developer Platform. Add a new app and choose the permission(s) you’d like your app to have.
In this case, we would like the app to have read and write permissions. Without those, it can’t tweet anything on behalf of your user.
Make sure you fill in a callback url. This is the url Twitter makes a GET request to with the user’s tokens after authenticating your application. During development on your local machine you can use “127.0.0.1:3000/auth/twitter/callback”. You need to remember to change it however, once your app is hosted to it’s actual domain name/IP address.
(Twitter doesn’t let you fill in localhost in that field)
Next add these to your gemfile.
gem 'omniauth'
gem 'omniauth-twitter'
Then run bundle install.
Now we need to tell omniauth to use the omniauth-twitter strategy/provider. For that, we’ll create an intializer (in config/initializers) and call it ‘omniauth.rb’.
Rails.application.config.middleware.use OmniAuth::Builder do
  provider :twitter, "API_KEY", "API_SECRET"
end
You can get your API_KEY and API_SECRET from the app you created in the first step.
It’s not good practice to write your app credentials in your code like that, especially if you’re working with people and pushing the code to a repository. Anybody with repo access can take those keys and do whatever they want with them.
What you can do instead is replace them with environment variables that exist only on the server or your hosting platform. Environment variables are pretty easy to add to Heroku.

Then you can access them in your code like this.
Rails.application.config.middleware.use OmniAuth::Builder do
  provider :twitter, Rails.application.secrets.twitter_api_key, Rails.application.secrets.twitter_api_secret
end
And then in your secrets.yml file, add this to the appropriate environment(s).
production:
  secret_key_base: <%= ENV["SECRET_KEY_BASE"] %>
  twitter_api_key: <%= ENV["TWITTER_API_KEY"] %>
  twitter_api_secret: <%= ENV["TWITTER_API_SECRET"] %>
That way the app knows to look for your twitter api key in an environment variable called “TWITTER_API_KEY”.
You also need to add a route telling rails to direct the callback twitter makes to your controller. And since we’re “signing in users” after getting authenticated, it makes sense to do that in a sessions controller.
get '/auth/:provider/callback', to: 'sessions#create'
In your view, you need a button or a link that kicks off this whole authentication process.
<a target="_blank" href="/auth/twitter" class="main-button">
Yup, that simple.
If you start your server now and click on the link, it would open up the “Sign in with Twitter” page in a new tab, and after authenticating the app with what I assume would be your twitter account, it should redirect you to your app.
But of course, there’d be an exception/error. This is because you either haven’t created your sessions controller or added a “create” action to it. So let’s do that.
class SessionsController < ApplicationController
  def create
    @user = User.find_or_create_from_auth_hash(auth_hash)
    session[:user_id] = @user.id
    redirect_to *whatever_path_you_want*
  end


  protected
  def auth_hash
    request.env['omniauth.auth']
  end
end
The code above is pretty straightforward, the auth_hash method gets all the data that twitter passes back to you and we need that data to create a user, or find an already existing user and set that user to the current user. Right after all of that you can redirect to whatever view path you’d like.
Unfortunately, the code above isn’t going to work and that’s because we don’t have a User model or a find_or_create_from_auth_hash method.
What needs to be done now is to generate a User model and run the migration(s). My User model has only the following attributes: provider, uid, token and secret. You can have way more attributes than that, because the auth_hash comes loaded with a lot of data about the user, from their avatar urls to their follower count and etc.
Now that you have your User model:
class User < ActiveRecord::Base

  def self.find_or_create_from_auth_hash auth_hash
    user = where(provider: auth_hash[:provider], uid: auth_hash[:uid]).first_or_create
    user.update(
        token: auth_hash[:credentials][:token],
        secret: auth_hash[:credentials][:secret]
    )
    return user
  end
end
This creates a class method that takes the auth_hash passed into it, tries to find if the user already exists or creates it instead.
Now your session’s create action should work fine and should redirect to the page of your wishes.
Another neat trick is to add the code below to your application controller, so that you can easily get the current user if you need to, with a helper method.
class ApplicationController < ActionController::Base
  protect_from_forgery with: :exception

  def current_user
    @current_user ||= User.find(session[:user_id]) if session[:user_id]
  end

  helper_method :current_user
end
Setting up Resque
To use resque, you have to have a redis server running on your machine. Follow this quickstart guide on installing redis and start the server without any arguments.
You can now add Resque and Resque Scheduler to your gem file and bundle install.
gem 'resque'
gem 'resque-scheduler'
When that’s done, you need to create an initializer called “resque.rb” with this code:
require 'resque'
require 'resque-scheduler'
require 'resque/scheduler/server'
And add this to your routes:
mount Resque::Server.new, at: '/resque'
And this to the top of your routes file, before any other line of code:
require 'resque/server'
What the above does is to make sure all the resque and resque-scheduler files (classes and methods) are loaded when your rails app starts.
The route mounts resque’s very useful web interface at http://your-domain/resque. With the web interface, you can easily see which jobs are pending, which jobs have failed and how many workers are working.
You also need to add a resque.rake file to your lib/tasks folder with the following code.
require 'resque/tasks'
require 'resque/scheduler/tasks'
task 'resque:setup' => :environment
Acquiring Tweeting Powers
We (can) now have users in our database and we have the credentials necessary to tweet for them. We’ve also set up Resque and can write code to run tasks in the background at given times in the future.
First of all, to make it easier to send out a tweet on behalf of a user. I added the twitter gem and (following the documentation) I wrote an instance method in the User method that returns a twitter “client” any time it’s called.
class User < ActiveRecord::Base  ...  def twitter
    client = Twitter::REST::Client.new do |config|
      config.consumer_key        = Rails.application.secrets.twitter_api_key
      config.consumer_secret     = Rails.application.secrets.twitter_api_secret
      config.access_token        = token
      config.access_token_secret = secret
    end
  end
end
The method above can be used in the following manner to send out a tweet.
@user = *somehow_retrieve_a_user*
@user.twitter.update("Helloworld is awesome")
Back To Resque
Now that we can tweet, we need to set up a “job” that can be sent to a queue to be executed asynchronously.
You’ll need to create an apps/jobs folder, and toss in a new job file TweetSender.rb.
class TweetSender
  def self.queue; :tweets end

  def self.perform user_id
    User.find(user_id).twitter.update(SenateTweet.message)
  end

end
Resque jobs are Ruby classes that have a class method called “perform”. The code written in the method “perform” is what is to be executed.
So we pass the user_id to the perform method, find that user and send a tweet on her/his behalf.
Ah but something is amiss. What is “SenateTweet.message”?
Sometimes I want to create my own classes with certain functionality to use in Rails but they don’t fit into any of the usual folders. They’re not models, views or controllers.
To do this and to make sure they’re loaded when the app starts, create a folder app/extensions, trod along to your application.rb file and add the following code:
module TweetSenate
  class Application < Rails::Application

    ...    config.autoload_paths += %W(#{config.root}/app/extensions)
  end
end
It tells Rails to autoload all the files in the extensions folder.
In this example/use case, we are going to create just one file in our extensions folder; SenateTweet.rb.
class SenateTweet
  @possible_messages = [
      ...
  ] # <- this is an array of all the possible strings that can be selected randomly to be tweeted.  def self.message
    return @possible_messages.sample
  end
end
The above is also pretty straightforward; anytime SenateTweet.message is called, a random string is selected and returned
Heroku Time
The next thing to do would be to push your app to heroku following their guide.
The reason we’re leaving local development is that we’ll need to use the Heroku Scheduler add on.
There are a couple of things that need to be taken care of once you’ve successfully pushed your app to heroku and they are as follows:
You need to create a Procfile. This is a file created in your application’s root folder named “Procfile” with no extension and what it does is to tell Heroku how to start your app. In this case, we need to tell Heroku how to start our worker(s).
I needed to have two workers, but I didn’t want to have more than one Heroku Dyno. This is where foreman comes in.
You simply add foreman to your gem file and bundle, then add this code to your Procfile.
worker: bundle exec foreman start -f Procfile.workers
Now you have to create a Procfile.workers file in the root folder of your application with the following code in it.
worker_1: env TERM_CHILD=1 RESQUE_TERM_TIMEOUT=7 COUNT=1 QUEUE=* bundle exec rake resque:workers
worker_2: env TERM_CHILD=1 RESQUE_TERM_TIMEOUT=7 COUNT=1 QUEUE=* bundle exec rake resque:scheduler
This would start one worker for resque and the other for resque-scheduler all on the same Dyno.
Next thing you have to do before pushing your code is to make sure you have the redis gem installed, and the following code in a redis.rb initializer.
$redis = Redis.new(url: ENV["REDIS_URL"], password: ENV["REDIS_PASSWORD"])
Remember we had redis running on our local machine but we don’t have anything of the sort on our server.
For the above code to make any sense, you need to sign in to Heroku and add the Heroku Redis add on. Click on it and go to settings to see the url and password then add those as environment variables. You’re basically telling Rails where to find the redis server and giving it access to interact with it.

The final thing we have to do is to write some code in a rake task and have this task be executed one random time a day, everyday.
First you need to add the Heroku Scheduler gem to your app and then click on it so we can tell it which rake task to run and how frequently it should run it.
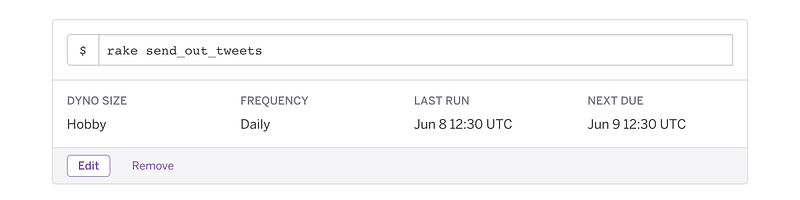
Click on “Add New Job” and fill in the values as in the image above.
Coup de grâce
Create a scheduler.rake file in your lib/tasks folder and fill it with the code below.
task :send_out_tweets => :environment do
  User.all.each do |user|
    random_number = rand(1..24)
    Resque.enqueue_in(random_number.hours, TweetSender, user.id)
  end

end
Yup, that simple.
What this does is to define the task that the rake scheduler will run once a day. In that task we take each user on the platform and enqueue the TweetSender job we created earlier to be executed in some (random) hours time from when the task is run. Obviously, it shouldn’t exceed 24 hours after because that wouldn’t be within the same day.
Now you can push your code to Heroku and you’re all done.
Final Notes
- Make sure to read the documentation of all the gems used, so you can better understand the code written here.
- Also, it’s always better to type out code you’re copying. Even if you plan on copying and pasting without giving it much though, typing it out, line by line, gets your fingers accustomed to the syntax.
- There are more than a couple of ways you can do things wrong and get frustrated, do not despair; Like I said earlier, just tweet at me with your problem and I’ll help.
- Also, the actual web application is actually currently being restricted by Twitter. I’ve sent an appeal and will update this if anything happens.